no permita que sus habilidades de diseño limiten sus diseños

 |  |
|---|---|
 |  |
 |  |
 |  |
 |  |
 |  |
 |  |
 |  |
 |  |
 |  |
 |  |
 |  |
 |  |
 |  |
Overview
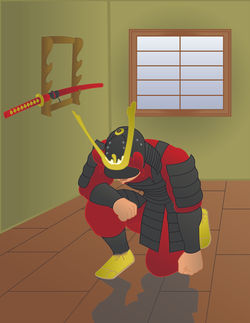
For this project, you will be using all of your design knowledge and Illustrator skills to create a custom poster that represents you. It is up to you to decide what this means. This could be a poster about your identity, family, or likes. Maybe you create a self-portrait or a poster about your favorite musician?
You should be focused on applying new skills or tools to this project. This will push your competencies by making a more creative design and it will allow you to be successful in your Skills/Tools competency as well.
Objective - What is the problem I need to solve?
-
How will I showcase all of my skills and knowledge from this semester in one project?
-
How will I learn new skills?
-
How will I create a poster that represents me?
Project Requirements
-
New skills or tools were used. Use tutorials to help grow skills, but do not just follow a tutorial to create the entire project.
-
Design needs to represent you in some manner.
Chatbot Help
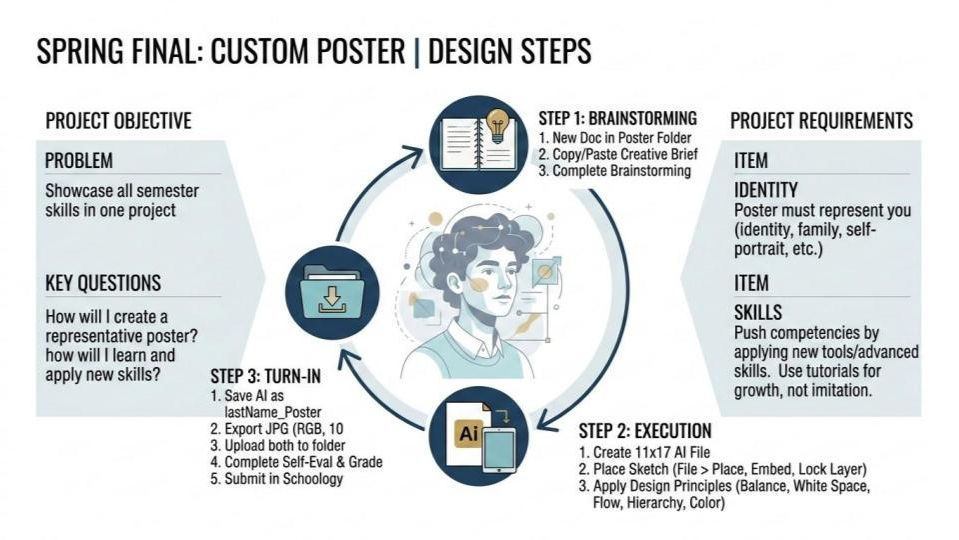
Step 1: Brainstorming Steps
-
Create a new folder inside your Final folder and name it “Poster”.
-
Copy and paste the Creative Brief into this new doc.
-
Put your name and period at the top and click on Untitled Document to name it correctly.
Step 2: Project Steps
-
Create an AI file that is 17x11” or 11x17”.
-
Upload your sketch or reference photo into Illustrator and embed it. Use your sketches to help you create your designs. You will lose points if you don’t do this.
-
Sketches and reference photos are kept on their own layer so Mr. Wiant can see the original ideas compared to your final design. It is best to lock this layer and name it.
Step 3: Turn In Directions
1. Save your Illustrator file as “lastName_poster.ai”.
2. Export your file as a JPG by going to File>Export>Export As and changing the format to JPG.
3. Make sure to check the Use Artboards box on the bottom left. If you don’t, you will not have a nice rectangle design and you will lose points.
4. Save your JPG file using the settings below:
- Color Model: RGB
- Quality: 10
- Resolution: 300
5. Place both the JPG and the Illustrator files into your project.
6.Submit Final Checklist in Schoology.